chiliGREEN MS1761 – page 5
Manual for chiliGREEN MS1761

3-35
Getting Started
that your each tap on the touchpad is equivalent to pressing the left button. Tapping twice
more rapidly on the touchpad is to execute a double-click.
Drag and Drop
You can move files or objects in your notebook by using drag-and-drop. To do so, place the
cursor on the desired item and slightly tap twice on the touchpad, and then keep your fingertip in
contact with the touchpad on the second tap. Now, you can drag the selected item to the
desired location by moving your finger on the touchpad, and then lift your finger from the
touchpad to drop the item into place. Alternately, you can press and hold the left button when
you select an item, and then move your finger to the desired location; finally, release the left
button to finish the drag-and-drop operation.
1. Move the cursor by sliding
2
your fingertip.
1
2. Put your wrist on the desk
comfortably.

3-36
Getting Started
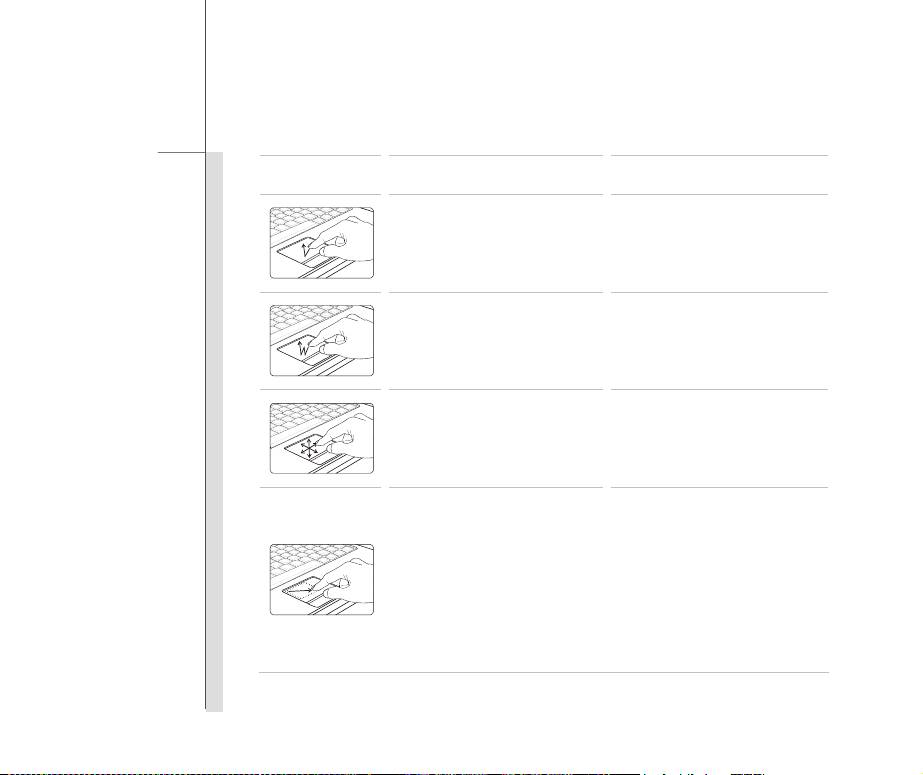
Knowing the Smart Pad
The Smart Pad integrated in your notebook allows users to perform various actions with multi-finger
taps and gestures while operating the notebook, and is capable to detect the changes of the
multi-finger movement performed by users
precisely. This significant Smart Pad will surely bring
users not only an efficient but also an enjoyable experience of using the notebook.
Brief Usages to the Smart Pad
For the further information on how to use the Smart Pad function specifically, please refer to the
instructions of Smart Pad by double clicking the Smart Pad icon (
) on the lower right side of
the screen.
3-37
Getting Started
Gestures
Actions Functions
Tapping the touchpad once
Single clicking the Left button
with one finger.
of the mouse.
Double tapping the touchpad
Double clicking the Left button
with one finger.
of the mouse.
Touch the touchpad with single
finger and move around your
Cursor moving.
finger on the touchpad.
Move the cursor to a particular
object with single finger.
Select the object by tap the
touchpad once
Double tapping the selected
Dragging an object.
object with single finger, and
remain your finger on the
touchpad.
Move your finger to drag the
selected object
3-38
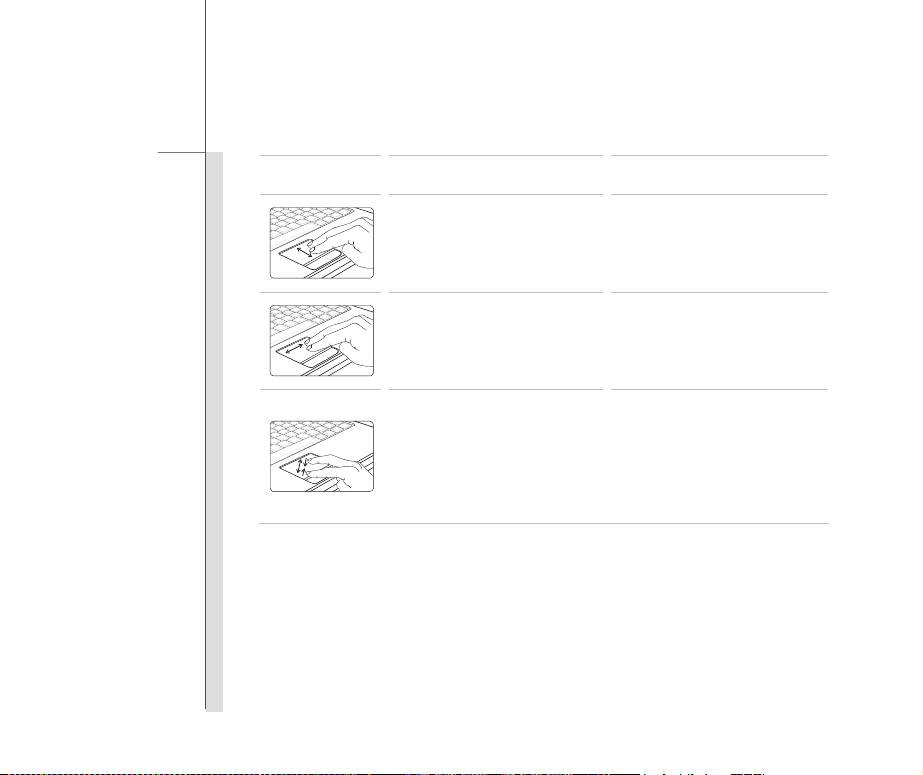
Getting Started
Gestures
Actions Functions
Touch the touchpad with two
fingers and remain the fingers
on the touchpad.
Scrolling a page vertically.
Move the two fingers on the
touchpad vertically.
Touch the touchpad with two
fingers and remain both fingers
on the touchpad.
Scrolling a page horizontally.
Move the two fingers on the
touchpad horizontally.
Touch the touchpad with two
fingers and remain both fingers
on the touchpad.
Move two fingers to close each
Zoom In/ Out the screen.
other to Zoom Out the screen.
Move two fingers away each
other to Zoom In the screen.

3-39
Getting Started
About Hard Disk Drive
Your notebook is equipped with a 2.5-inch hard disk drive. The hard disk drive is a storage device
with much higher speed and larger capacity than other storage devices, such as the floppy disk drive
and optical storage device. Therefore, it is usually used to install the operating system and
software applications.
To avoid unexpected data loss in your system, please backup your critical files regularly.
Do not turn off the notebook when the hard disk In-use LED is on.
Do not remove or install the hard disk drive when the notebook is turned on. The replacement of
hard disk drive should be done by an authorized retailer or service representative.

3-40
Getting Started
Using the Optical Storage Device
Your notebook is equipped with an optical storage device. The actual device preinstalled in your
notebook depends on the model you purchased.
DVD Super Multi: Works as a multi-functional DVD Dual Drive and a DVD RAM Drive. It is
capable to write CD-R, CD-RW, DVD-R/DVD-RW, or DVD+R/DVD+RW formats, and so on.
Blu-ray: It is a high-capacity optical disc that holds the high-definition video (HD) on a
single-sided disk. Blu-ray supports the more advanced H.264 and VC-1 video encoding
algorithms (codecs) as well as MPEG-2, which is used for DVD. It also supports the highest
HDTV resolution.
3-41
Getting Started
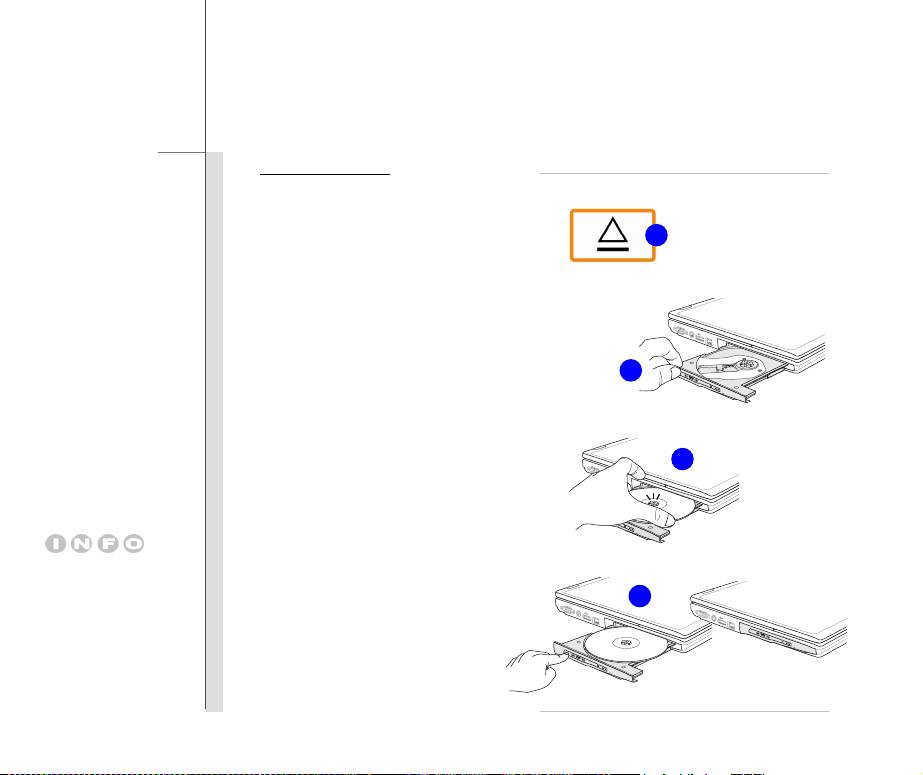
Inserting the Disk
The following instructions describe the
general procedure when operating the
optical storage device:
2
1. Confirm that the notebook is turned on.
2. Touch the EJECT quick launch sensor
and the disk tray will slide out partially.
Please Note: The ODD Eject sensor is
functional under pure DOS system.
3
However, in an Operating System
without the S-Bar application installed,
the Eject sensor will not be functional.
4
In such a case, users can right-click the
ODD in "My Computer" and select
"Eject" to eject the ODD tray.
3. Gently pull the tray out until fully
1. Confirm that the disk is
extended.
placed correctly and
4. Place your disk in the tray with its label
5
securely in the tray
facing up. Slightly press the center of
before closing the tray.
the disk to secure it into place.
2. Do not leave the disk
5. Push the tray back into the drive.
tray open.
3-42
Getting Started
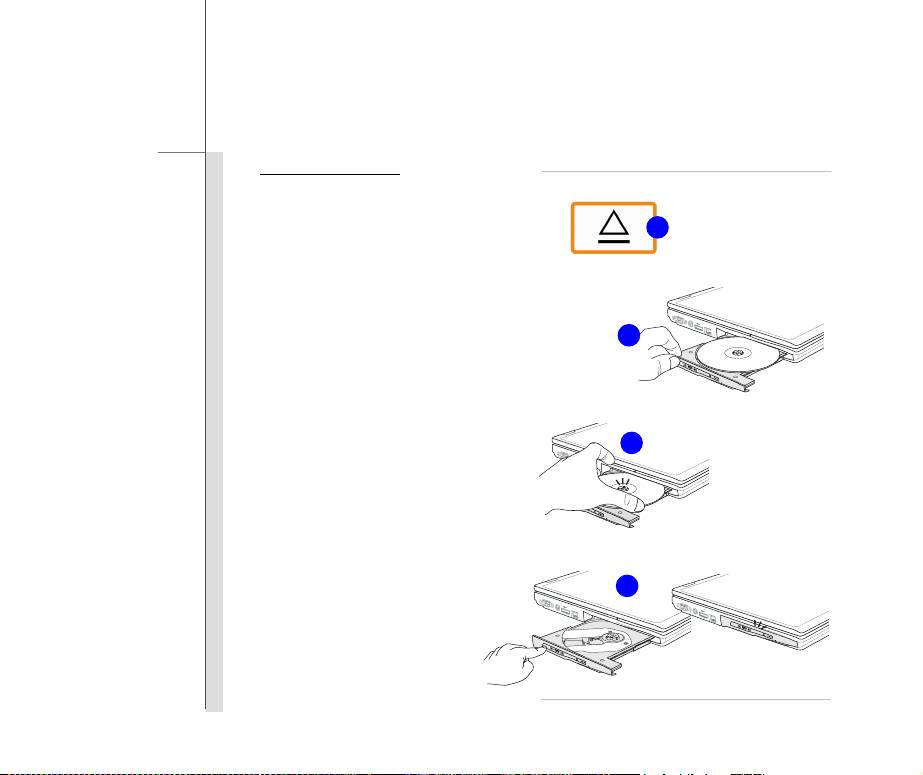
Removing the Disk
Follow the instructions below to remove the
disk that is placed in the optical storage
6
device:
6. Touch the EJECT quick launch sensor
and the disk tray will slide out partially.
7
7. Gently pull the tray out until fully
extended.
8
8. Hold the disk by its edge with your
fingers and lift it up from the tray.
9
9. Push the tray back into the drive.

3-43
Getting Started
Connecting the External Devices
The I/O (input/output) ports on the notebook allow you to connect peripheral devices. All devices
listed here are for reference only.
Connecting the Peripheral Devices
Connecting the USB devices
This notebook provides USB ports for connecting various USB devices, such as mouse, keyboard,
digital camera, webcam, printer, and external optical storage device, ete.. To connect these
devices, install the drivers for each device first if necessary, and then connect the device to the
notebook. This notebook is capable to auto detect the USB devices installed, and if there is no
detection of the devices, please manually enable the USB devices by going to Start Menu / Control
Panel / Add Hardware to add the new device.
The devices shown in the
reference figures here may
be different from the devices
users have.
3-44
Getting Started
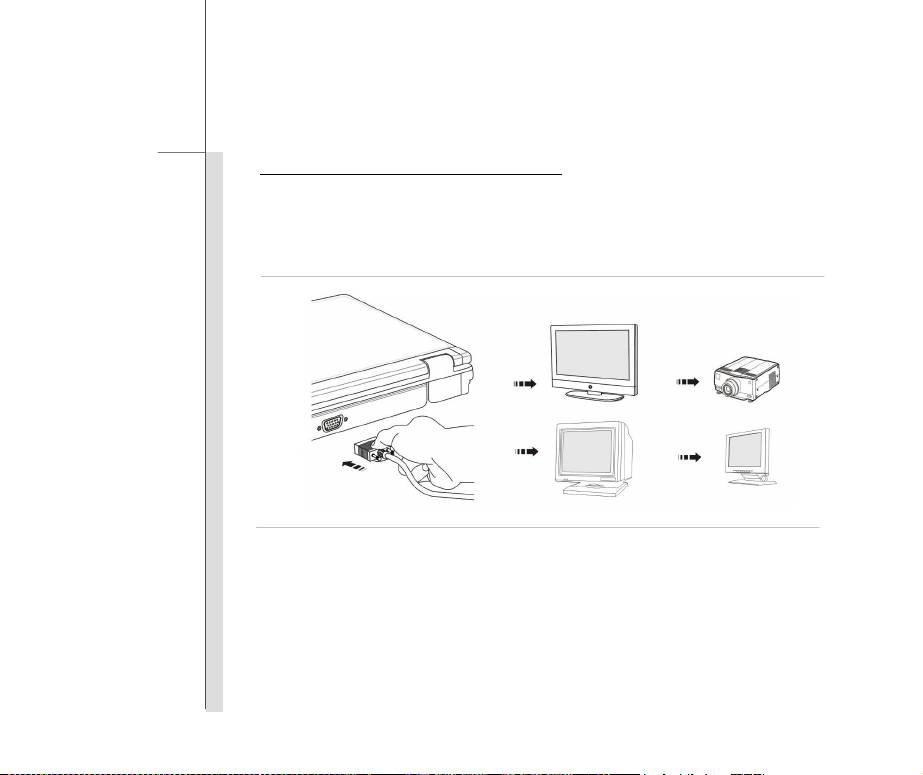
Connecting the External Display Devices
This notebook provides a VGA port for connecting a larger display with higher resolution. The
15-pin D-Sub VGA port allows users to connect an external monitor or other standard
VGA-compatible device (such as a projector) for a great view of the notebook display.

3-45
Getting Started
HDMI (High Definition Multimedia Interface) is a new interface standard for PCs, displays and
consumer electronics devices that supports standard, enhanced and high-definition video, plus
multi-channel digital audio on a single cable.
Once the display is connected to the notebook, power on the notebook and the external display
should respond by default. If not, you can switch the display mode by pressing [Fn]+[F2].
Alternately, you can change the display mode by configuring the settings in Display Properties of
Windows operating system.

3-46
Getting Started
Connecting the External SATA Hard Disk device
The E-SATA Connector allows you to connect an external Serial ATA hard disk device. Users can
now utilize shielded cable outside the notebook to take advantage of the benefits the SATA
interface brings to storage.
The E-SATA standard interface supports “plug-and-play” technology, so that you can connect and
remove the E-SATA devices without turning off the notebook.
To connect the E-SATA hard disk device, simply connect the cable of the device to the E-SATA
Connector of your notebook.
3-47
Getting Started
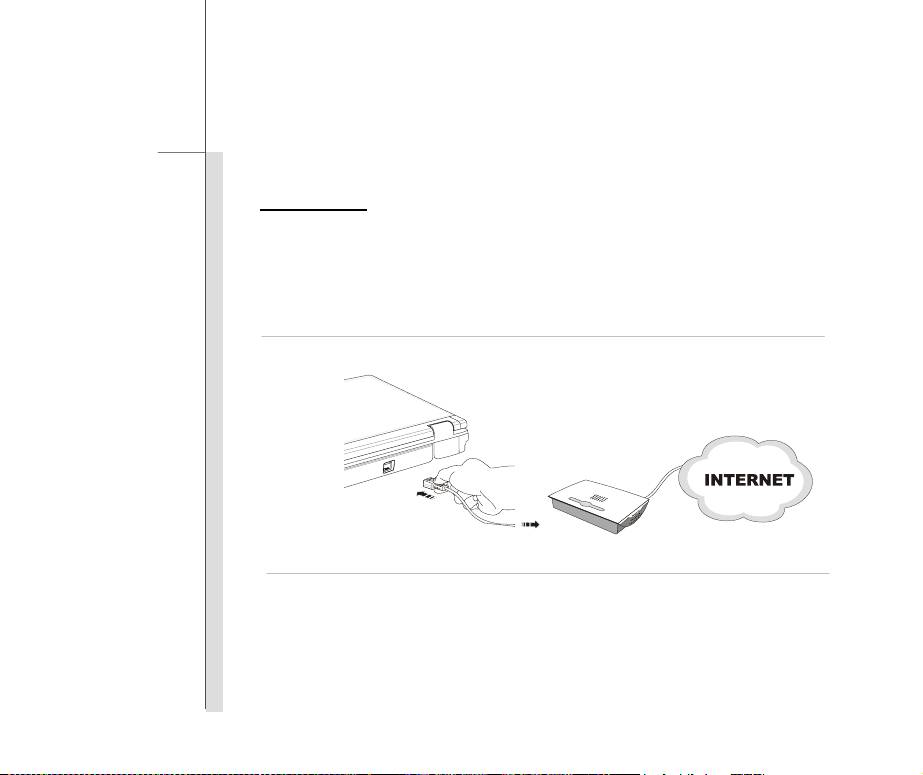
Connecting the Communication Devices
Using the LAN
The RJ-45 connector of the notebook allows you to connect the LAN (local area network) devices,
such as a hub, switch and gateway, to build a network connection.
For more instructions or detailed steps on connecting to the LAN, please ask your MIS staff or
network manager for help.
3-48
Getting Started
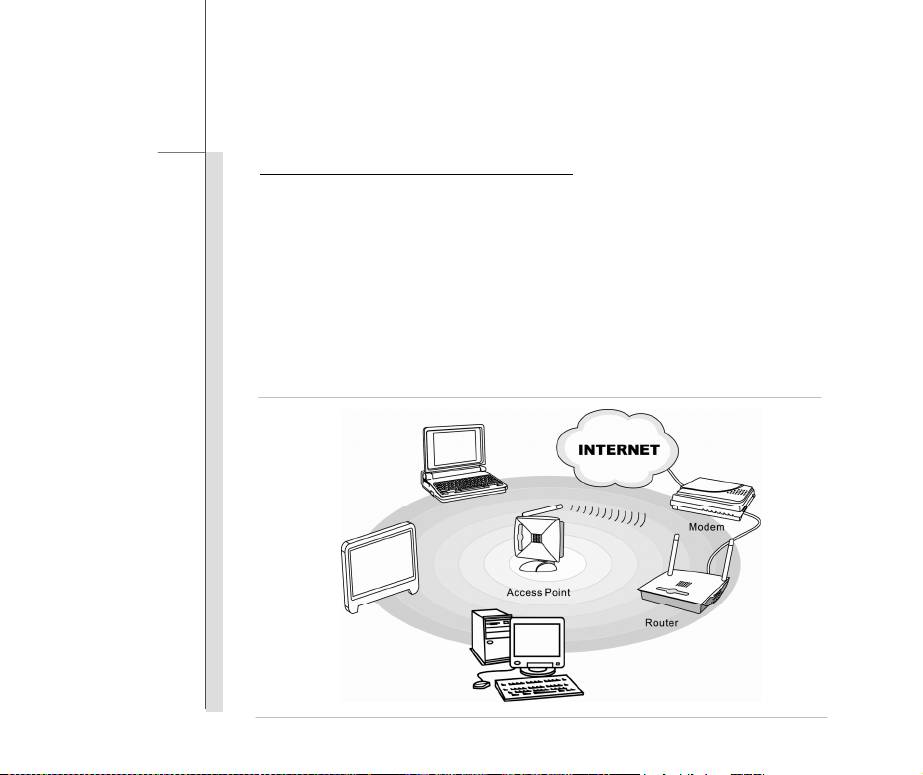
Using Wireless LAN Connection (optional)
This notebook is equipped with wireless LAN module which allows users to perform fast data
transmission with the standard IEEE 802.11 for wireless LAN. This gives users the mobility to
move around within a broad coverage area and still be connected to the network.
By using the 64-bit/128-bit Wired Equivalent Privacy (WEP) encryption technology and Wi-Fi
Protected Access feature, the optional built-in wirelesses LAN is capable to achieve a more efficient
and a more secure solution to the wireless communication.
For more instructions or detailed steps on connecting to the Wireless LAN, please ask your MIS staff
or network manager for help.
3-49
Getting Started
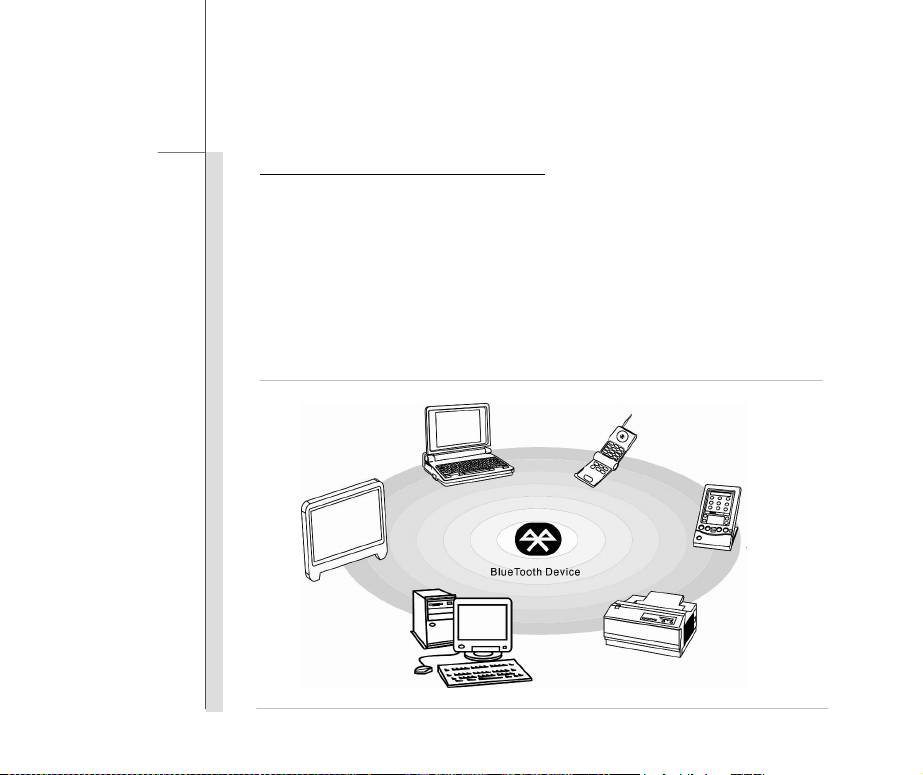
Using Bluetooth Connection (optional)
This notebook is equipped with Bluetooth module which allows to users to connect various
Bluetooth-enabled devices to the notebook. Bluetooth provides a way to connect and exchange
information between devices such as mobile phones, personal computers, printers, GPS receivers,
PDAs, digital cameras, and video game consoles through a secure, globally unlicensed Industrial,
Scientific and Medical (ISM) 2.4 GHz short-range radio frequency bandwidth.
For more instructions or detailed steps on using the Bluetooth function, please ask your MIS staff or
network manager for help.
3-50
Getting Started
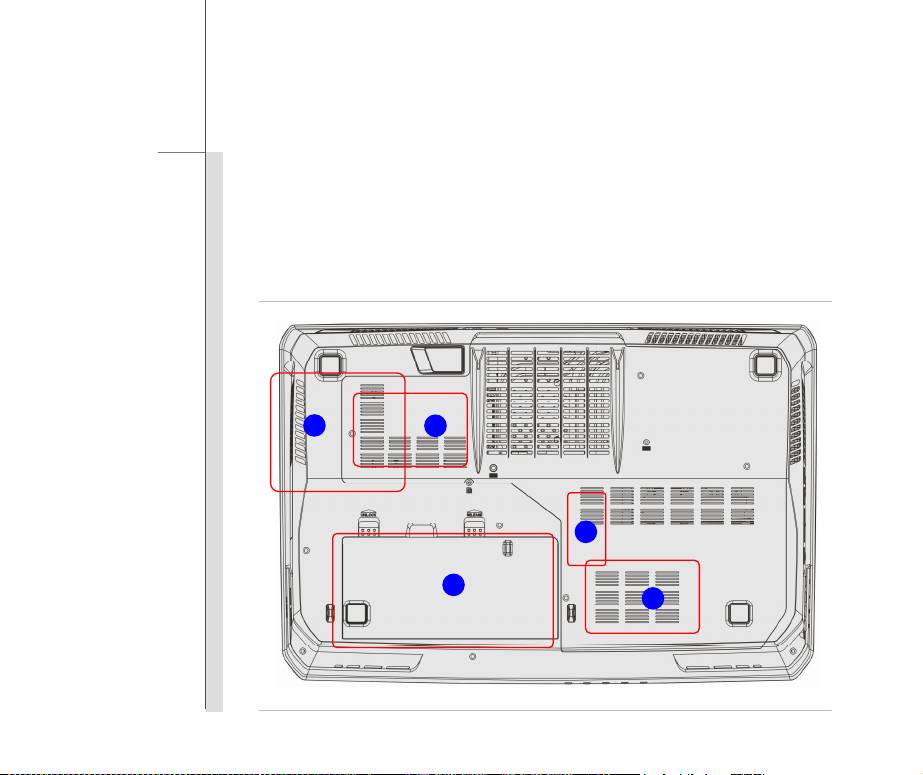
Components Replacement and Upgrade
Please be noticed that the memory, hard disk drive, wireless LAN / Bluetooth module and battery
pack preinstalled in the product users purchased may be upgradable or replaceable by user’s
request depending on the models users purchased.
2
3
4
1
3
3-51
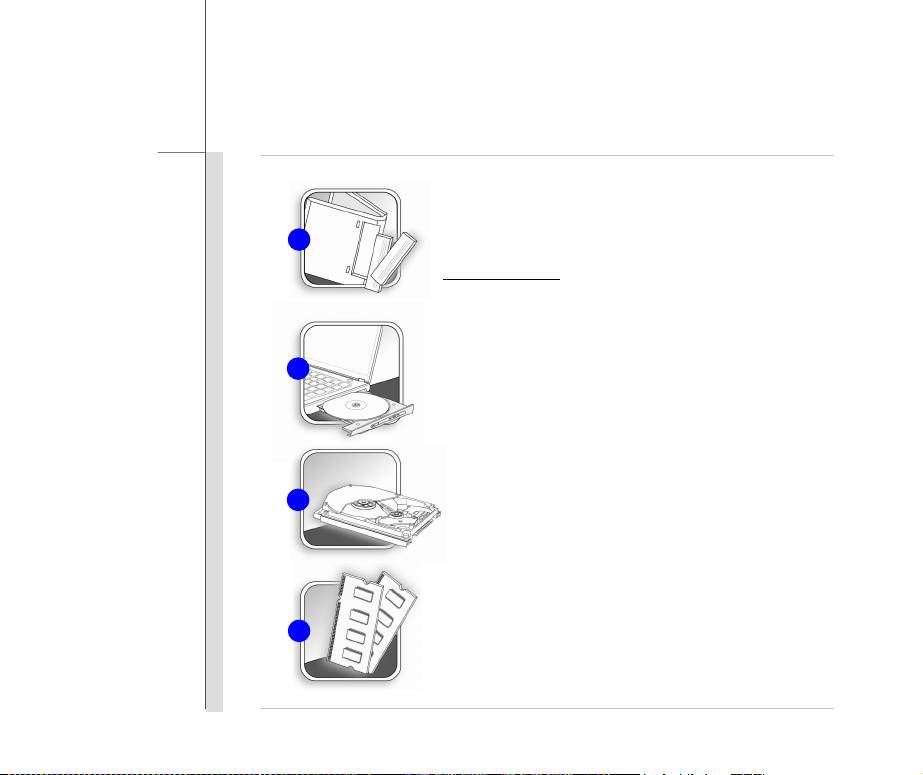
Getting Started
This notebook is equipped with a high-capacity Li-ion battery
pack, and the battery pack is replaceable by users.
1
To replace the battery pack, please refer to the section of
Using Battery power
for details.
This notebook is equipped with an optical drive device, and
this device may be upgradable and replaceable by the
2
authorized dealer or service center.
This notebook is equipped with a hard disk drive, and this
3
storage device may be upgradable and replaceable by the
authorized dealer or service center.
Additional memory module may be installed, by the authorized
4
dealer or service center, to increase the performance of this
notebook, depending on the specification limitation.

3-52
Getting Started
To learn more about upgrade limitation, please refer to the specification in the User’s Manual
provided. For any further information about the product users purchased, please contact the local
dealer.
Do not attempt to upgrade or replace any component of the product, if you are not an authorized
dealer or service center, since it may cause the warranty void. It is strongly recommended to contact
the authorized dealer or service center for any upgrade or replace service.

CHAPTER 4
BIOS Setup

4-2
BIOS Setup
About BIOS Setup
When to Use BIOS Setup?
You may need to run the BIOS Setup when:
An error message appears on the screen during the system booting up and is requested to
run SETUP.
You want to change the default settings for customized features.
You want to reload the default BIOS settings.
How to Run BIOS Setup?
To run the BIOS Setup Utility, turn on the notebook and press the [Del] key during the POST
procedure.
If the message disappears before you respond and you still wish to enter Setup, either restart the
system by turning it OFF and ON, or simultaneously pressing [Ctrl]+[Alt]+[Delete] keys to restart.
Be noted that the screen snaps and setting options in this chapter are for your references only.
The actual setting screens and options on your Notebook may be different because of BIOS update.
