Xoro HSD 2220 – страница 3
Инструкция к DVD-проигрывателю Xoro HSD 2220

Glossar
rung und Decodierung vollständig voneinander getrennt bleiben. Dolby Digital 5.1 ist der
Industriestandard für die Codierung von DVD-Filmen mit Surround-Sound.
Deutsch
DSP
Digital Signal Processor. Abkürzung für Mikrochips, die Signale (z.B. den Ton) digital weiter-
verarbeiten (z.B. wird Virtual Surround durch einen DSP erzeugt).
DTS
®
®
®
DTS
ist ein mit Dolby Digital
konkurrierender Kodierstandard. DTS Digital Surround
ist
®
ein Mehrkanaltonsystem von Digital Theater Systems. Es arbeitet wie auch Dolby Digital
mit bis zu 5.1 Kanälen. Jedoch liegt die mögliche Datenrate weit über 1 MBit/s, muss also
®
nicht so stark komprimiert werden, was im Vergleich mit Dolby Digital
zu geringeren Quali-
tätsverlusten führt. Der Frequenzbereich umfasst 20Hz bis 20kHz bei 20Bit, der Basskanal
reicht aber nur bis 80Hz. Das verwendete Kodierungsverfahren heißt CAC.
DVD
Die DVD (Digital Versatile Disk) kam 1995 auf den Markt und ist ein Datenträger mit grosser
Speicherkapazität. Eine gewöhnliche CD-ROM, die einen Speicherplatz von 650 MB auf-
weist, wird durch den Speicherplatz der DVD von bis zu 9 GB in den Schatten gestellt. Gera-
de bei der Wiedergabe von Videoformaten spielt die Speicherkapazität eine große Rolle.
Neben dem hohen Speicherplatz genießt der Konsument bei der Wiedergabe von DVDs
zusätzlich hochwertige digitale Bild- und Tonqualität. Bis zu acht Audiokanäle kann eine
DVD ansteuern. Das heißt im besten Fall, das ein Film in 8 Sprachen gehört werden kann.
JPEG CD
Eine JPEG-CD ist ein Disk zur Speicherung von Fotos auf einer CD-R, CD-RW, DVD-R,
DVD-RW, DVD+R oder DVD+RW in einer plattformenabhängigen Struktur (Unterstützung
verschiedener Auflösungen). Bitte erstellen Sie die Disk nicht im Multi-Sessionverfahren.
GUI
Graphic User Interface Siehe OSD.
HDCD
Pacific Microsonics hat eine digitale Audiotechnologie entwickelt, die das volle Potenzial
einer CD ausschöpft. Der HDCD-Prozess (High Definition Compatible Digital) ist ein paten-
tierter Kodierungs- und Dekodierungs-Prozess, der die gesamte Fülle und Detailgenauigkeit
eines hoch auflösenden "Master Recordings" auf die CD übertragen kann. Es gab schon
verschiedene Versuche, die Klangqualitäten von CDs zu verbessern, jedoch gibt es keine,
die mit dem HDCD-Prozess vergleichbar wären.
Helligkeit
Das Wort Helligkeit wird meist für die subjektive Lichtempfindung benutzt. Sie kann aber bei
verschiedenen Personen etwas unterschiedlich sein. Sie hängt insbesondere von der spekt-
ralen Empfindlichkeit der Sehzellen ab.
41

Glossar
Hosiden-Buchse
4-poliger Anschluß für S-Video-Verdindungen
Interlaced
Bildaufbauverfahren im Zeilensprungverfahren. Hierbei werden nacheinander zwei um eine
Deutsch
Bildzeile versetzte Halbbilder erzeugt. Dies ist das übliche Verfahren bei herkömmlichen 50
Hz TV Geräten.
Komponenten-Signal
siehe YUV
Kontrast
Bezeichnet die Höhe des Helligkeitsunterschiedes zwischen hellstem und dunkelstem dar-
stellbaren Bildpunkt.
LPCM
Die Abkürzung LPCM steht für: Linear Pulse Code Modulation.
Digitale, unkomprimierte Audio-Aufnahme; Standardverfahren für konventionelle Audio-CDs.
MP3
Der MPEG 1 Layer 3 Codec, kurz MP3, wurde 1987 vom Fraunhofer Institut für Integrierte
Schaltungen erfunden und war damals ein revolutionärer Komprimierungsalgorithmus. 1992
wurde dieser Teil des MPEG 1-Formats. Da es aber eine erstaunlich gute Qualität bei sehr
kleinen Dateigrößen hatte, popularisierte es sich schnell als eigener Standart. Man kann mit
diesem Codec Audio-Dateien auf eine Größe von 1 MB / Minute verkleinern.
MPEG-4
MPEG-4 ist ein MPEG-Standard (ISO/IEC-14496), der unter anderem Verfahren zur Video-
und Audiokompression beschreibt. Ursprünglich war das Ziel von MPEG-4, Systeme mit
geringen Ressourcen oder schmalen Bandbreiten (Handy, Videophone, ...), bei relativ gerin-
gen Qualitätseinbußen zu unterstützen. Jedoch deckte der H.263 Standard der ITU diesen
Bereich bereits sehr gut ab, so dass die MPEG-Entwickler in MPEG-4 für reine Videokom-
pression H.263 fast vollständig übernahmen und sich mit MPEG-4 der weiteren Funktionali-
tät auf Bildkomponenten (z.B. audiovisuelle Objekte, etwa Buttons für Perspektivwahl) wid-
meten. Kombiniert wird MPEG-4 meistens mit den populären Audiokompressionsverfahren
MP3 oder mit Dolby Digital Verfahren AC-3.
NTSC
Vor allem in Amerika und Asien verbreiteter Fernsehstandard. 525 (480 sichtbare) Zeilen
und 60 Hertz Bildwiederholfrequenz. Bezeichnet die Art, wie die Bildinformationen
(Helligkeit, Farbe, Art des Bildaufbaus, Bildwiederholfrequenz usw.) übertragen werden. In
Europa findet man diesen Standard in der Regel nur auf importierten Medien (z.B. amerika-
nischen DVD‘s).
42

Glossar
OSD
Als OSD (On Screen Display) bezeichnet man die auf dem Bildschirm angezeigten Menüs
Deutsch
und Optionen. Das GUI stellt die Schnittstelle zwischen der Gerätehardware und dem Benut-
zer her.
PAL
Europäischer Fernsehstandard. Steht für Phase Alternation Line; Bildwiederholfrequenz: 50
Hz, Zeilenauflösung: 625 Zeilen, davon 576 sichtbar. Bezeichnet die Art, wie die Bildinforma-
tionen (Helligkeit, Farbe, Art des Bildaufbaus, Bildwiederholfrequenz usw.) übertragen wer-
den.
PBC
PBC ist die „Play Back Control“ (Wiedergabekontrolle). Diese Funktion kann man bei einer
Video CD zum Anzeigen des Menüs benutzen, wenn ein solches auf der VCD vorhanden ist.
In diesem Menü können Sie sich dann mit den Pfeiltasten bewegen und mit "ENTER" die
gewünschte Funktion anwählen.
®
Pro Logic
®
Dolby Pro Logic
ist ein Matrix-Decoder, der die vier Surround-Sound-Kanäle, die in der
®
Stereo-Tonspur von im Dolby Surround
-Verfahren codierten Programmen (wie z. B. VHS-
Filmen oder TV-Shows) enthalten sind, wieder decodiert. Bei Dolby Surround handelt es sich
um ein Matrix-Codierverfahren, das vier Kanäle (Links, Center, Rechts, Surround) auf Ste-
reo-Tonspuren abmischt. Ein Pro Logic-Decoder "trennt" die vier Kanäle bei der Wiedergabe
wieder. Ohne einen Pro Logic-Decoder werden in dieser Weise codierte Programme im
normalen Stereoton wiedergegeben.
Progressive Scan
Im Gegensatz zur Halbbildwiedergabe (interlaced) arbeitet Progressive Scan mit Vollbild-
technik und liefert eine weitaus höhere Bildqualität, insbesondere in Verbindung mit Projek-
toren oder PC-Monitoren.
RGB
engl. Red Green Blue. Übertragungs- und Anzeigeart von Videosignalen getrennt nach den
im TV-Bereich üblichen Einzelfarben rot, grün und blau. Als Verbindung zum TV-Gerät bietet
RGB eine ähnlich gute Qualität wie YUV.
S/PDIF
S/PDIF (Sony/Philips Digital Interface) ist ein Standard-Übertragungsformat für Audiodatei-
en. S/PDIF ermöglicht die Übertragung von Audiodaten aus einer Datei in eine andere, ohne
hierzu eine Konvertierung in ein analoges Format durchführen zu müssen, worunter die
Signalqualität leiden würde.
S-Video
Übertragungsart für Videosignale, bei der Helligkeit- und Farbinformationen voneinander
getrennt übertragen werden. Der S-Video-Port ist an dem vierpoligen Hosiden-Anschluss zu
erkennen.
43

Glossar
Seitenverhältnis: 4:3 und 16:9
"Vollbildformat" ("Full Frame") bezieht sich auf Inhalte, die für die Darstellung auf TVs mit
einem Seitenverhältnis von 4:3 entwickelt wurden. "Breitbildformat" ("Widescreen") bezieht
sich auf Inhalte, die für die Darstellung auf Bildschirmen mit einem Seitenverhältnis von 16:9
(wie z. B. Breitbild-Fernsehgeräte) entwickelt wurden. Werden Inhalte im Breitbildformat auf
Deutsch
einem 4:3-Bildschirm angezeigt, so erscheinen im entstehenden Leerraum am oberen und
unteren Bildrand schwarze Streifen.
Schärfe
Mit Bildschärfe oder Schärfe ist ein Kriterium bezeichnet, das sich an Kanten sehen und
messen lässt. Je abrupter die Übergänge von Dunkel zu Hell sind, messtechnisch gespro-
chen: je enger die Grauzone ist im Verhältnis zu einer vorgegeben Linienstärke, umso
schärfer ist die Abbildung.
Super Video CD (SVCD)
SVCD steht für "Super VideoCD". SVCDs sind den VCDs sehr ähnlich; sie fassen (auf 650-
bzw. 700-MB-CDs) etwa 35 bis 60 Minuten sehr hochwertige Videodaten sowie bis zu 2
Stereo-Tonspuren und 4 wählbare Untertitel. SVCDs können auf allen Xoro DVD-Playern
abgespielt werden.
Video CD(VCD)
VCD steht für "Video Compact Disc". VCDs bauen auf dem CD-Format auf und enthalten
Bewegtbilder mit Ton. Eine VCD fasst bis zu 74 bzw. 80 Minuten (650- bzw. 700-MB-CDs)
Video mit Stereosound. Zur Speicherung der Video- und Audiodaten verwenden VCDs ei-
nen Komprimierungsstandard namens MPEG. VCDs können auf allen Xoro DVD-Playern
abgespielt werden.
YPbPr / YCbCr / YUV
Videosignal, bei dem in der Signalübertragung Farb- und Helligkeitsinformationen getrennt
werden. Ähnlich der RGB Übertragungstechnik werden die Signale über 3 Cinch-Leitungen
übertragen. Wird auch als Komponenten-Signal bezeichnet. Über YUV erhält man die bei
analogen Videosignalen bestmögliche Signalübertragung.
44


Table of Content
Table of Content 3
Safety Information 4
Recycling Information 8
Accessories / Features 9
Quick Start Guide 10
Control Elements
Front Side 11
English
Rear Side 11
Connection
Video Outputs 12
Audio Outputs 14
Remote Control
Insert Batteries and Operation Range 15
Buttons 16
Playback
Title / Menu / Stop / Fast playback / Stepwise 17
Angle / Audio / Chapter or Track 18
Repeat / A-B Segment playback / Volume 19
Zoom / Information 20
Search / Subtitle / P-SCAN / USB 21
Slow / Resume / Mute / PBC / Clear / PAL or NTSC 22
Program / R/L 23
JPEG Files 24
Music 26
MPEG-1, MPEG-2 or MPEG-4 video files 27
USB 29
Setup
General Settings 30
Audio Settings 32
Dolby Digital Settings 33
Video Settings 34
Preferences 35
Troubleshooting DVD 37
Speciifcation 39
Glossary 40
3
Safety Information
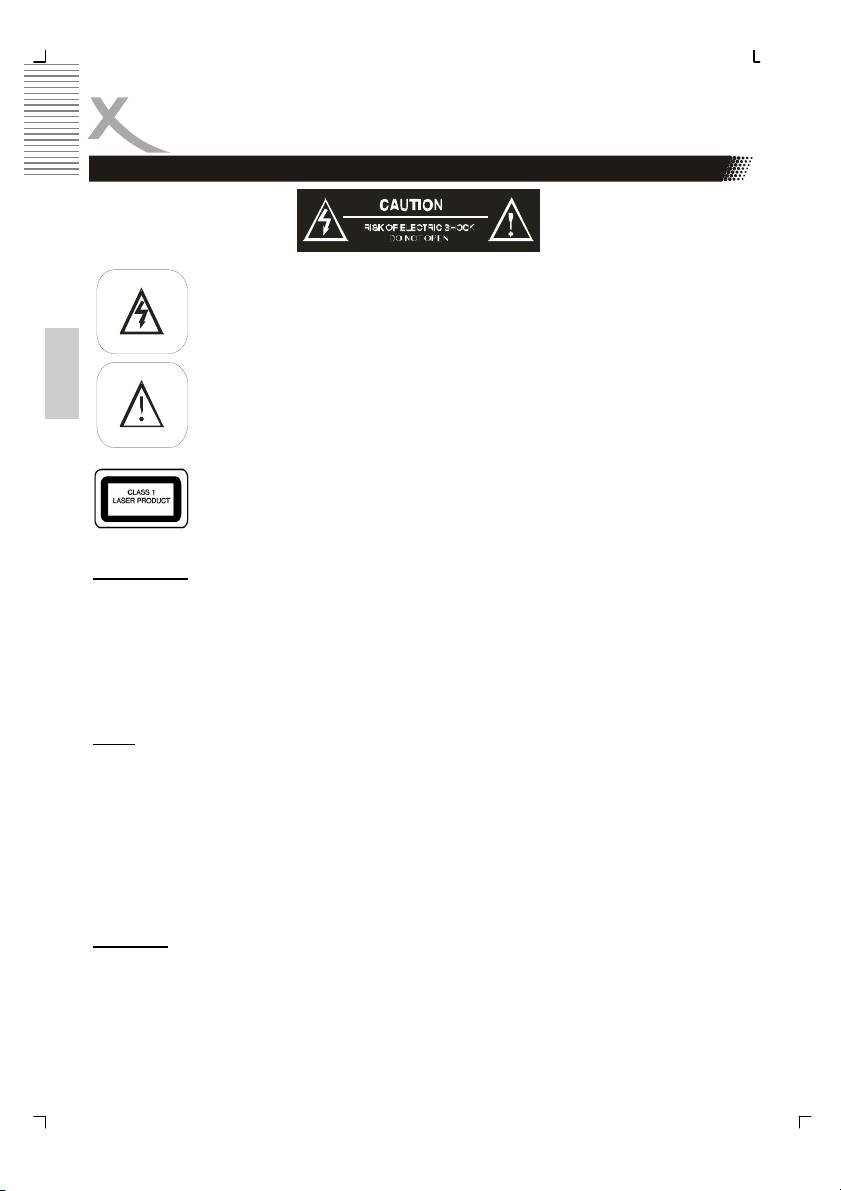
The lightning flash with an arrowhead symbol within an equilateral triangle is
intended to alert the user of the presence of uninsulated
"dangerous voltage" within the product's enclosure that may be of sufficient
magnitude to constitute a risk of electric shock to persons.
The exclamation point within an equilateral triangle is intended to alert the
user of the presence of important operating and
English
maintenance (servicing) instructions in the literature accompanying the ap-
pliance.
THIS DEVICE COMPLIES WITH PART 15 OF THE FCC RULES. OPERA-
TION IS SUBJECT TO THE FOLLOWING TWO CONDITIONS: (1)THIS
DEVICE MAY NOT CAUSE HARMFUL INTERFERENCE, AND (2) THIS
DEVICE MUST ACCEPT ANY INTERFERENCE RECEIVED. INCLUDING
INTERFERENCE THAT MAY CAUSE UNDESIRED OPERATION.
User Manual
1. All the safety and operating instructions should be read before the product is oper-
ated.
2. Retain Instructions - The safety and operating instructions should be retained for
future reference.
3. All warnings on the product and in the operating instructions should be adhered to.
4. All operating and use instructions should be followed.
Laser
This Digital Video Disc Player employs a Laser System of the class 1.
1. Make sure the device is shut down prior to opening player lid.
2. Do not open the appliance. Do not attempt to dismantle the appliance.
3. In order to avoid any danger: Have service work only carried out by the manufac-
turer or an authorized service workshop.
4. Visible laser radiation when open and interlocks defeated.
5. Use of controls or adjustments or performance of procedures other than those speci-
fied herein may result in hazardous radiation exposure.
Operation
1. Playing of Video DVD or Video CD
2. Playing of Audio-CD
3. No other operation are allowed.
4

Safety Information
Power Supply
1. Never touch the plug with wet hands.
2. If you want to pull the plug out of the plug socket, always pull directly on the plug.
Never pull on the cable as it could tear.
3. Make sure that the power cable is not bent, caught or run over and that it does not
come into contact with heat sources.
4. Make sure that the power cable is not wound around the device while in operation.
5. Never place the machine on the power cable while it is being operated.
English
6. Only use extension cables that are designed for the power consumption level of the
machine.
7. Keep the appliance away from rain and any moisture.
8. Only operate the machine if the electrical voltage stated on the type plate beneath
the machine agrees with the voltage on your plug socket. The wrong voltage can
destroy the machine.
9. Do not stand vases etc. on the appliance. Water could seep into the appliance.
10. Do not open the appliance.
11. Pull out the mains plug if the appliance is not to be used over a longer period of
time.
12. Take care that nobody can trip over the power supply cable.
Disc Compatibility
1. Depending on the conditions of the recording equipment or the CD-R/RW (or DVD -
R, DVD +R, DVD -RW, DVD +RW) disc itself, some CD-R/RW (or DVD -R, DVD +R,
DVD -RW, DVD +RW) discs cannot be played on the unit.
2. Do not attach any seal or label to either side (the labelled side or the recorded side)
of a disc.
3. Do not use irregularly shaped CDs (e.g., Heart shaped or octagonal) since they may
result in malfunctions.
4. Some playback operations of DVDs and Video CDs may be intentionally pro-
grammed by software manufacturers. This unit plays DVDS and Video CDs accord-
ing to disc content designed by the software manufacturer, therefore some playback
features may not be available or other functions may be added.
5

Safety Information
Operation and Position
1. During playback, the disc rotates very fast. Do not open or do not move the player
during playback. Otherwise the disc can be damaged.
2. Do not connect accessories on the player which are not defined by the manufacture.
3. Do not place this product on an unstable cart, stand, tripod, bracket, or table. The
product may fall, causing serious injury to a child or adult, and serious damage to
the product. Use only with a cart, stand, tripod, bracket, or table recommended by
the manufacturer, or sold with the product.
4. Any mounting of the product should follow the manufacturer's instructions, and
should use a mounting accessory recommended by the manufacturer.
5. A product and cart combination should be moved with care. Quick stops, excessive
English
force, and uneven surfaces may cause the product and cart combination to overturn.
6. The player is able to show a still image on the TV screen or monitor over an unlim-
ited period of time. This can cause damage to the screen. It is therefore advisable to
activate the screen saver. Or switch the player off, if the device is not in use.
7. Do not uses the player permanent in the 4:3 mode. This can cause damage to the
screen.
8. Do not increase the volume when the player is just playing very quiet sections. This
cold damage the speaker if very loud passages starts all of a sudden after the quiet
section.
9. Place only CDs or DVDs into the tray.
10. Switch the player off by the Off/On switch if it is not going to used for a longer period
of time.
11. Disconnect the main plug during thunderstorms.
12. Slots and openings in the cabinet are provided for ventilation and to ensure reliable
operation of the product and to protect it from overheating, and these openings must
not be blocked or covered.
13. The openings should never be blocked by placing the product on a bed, sofa, rug, or
other similar surface.
14. This product should not be placed in a built-in installation such as a bookcase or
rack unless proper ventilation is provided or the manufacturer's instructions have
been adhered to.
15. Protect the device against weather influences, moistures and high temperature.
16. Never spill liquid of any kind on the product.
17. Do not expose the device and the remote control to direct sunlight.
6

Safety Information
Defect
1. Servicing - Do not attempt to service this product yourself as opening or removing
covers may expose you to dangerous voltage or other hazards. Refer all servicing to
qualified service personnel.
2. Damage Requiring Service - Unplug this product from the wall outlet and refer ser-
vicing to qualified service personnel under the following conditions:
a. When the power-supply cord or plug is damaged.
b. If liquid has been spilled, or objects have fallen into the product.
English
c. If the product has been exposed to rain or water.
d. If the product does not operate normally by following the operating instruc-
tions. Adjust only those controls that are covered by the operating instructions as an
improper adjustment of other controls may result in damage and will often require
extensive work by a qualified technician to restore the product to its normal opera-
tion.
e. If the product has been dropped or damaged in any way, and
3. When the product exhibits a distinct change in performance this indicates a need
for service.
4. When replacement parts are required, be sure the service technician has used re-
placement parts specified by the manufacturer or have the same characteristics as
the original part. Unauthorized substitutions may result in fire, electric shock, or
other hazards.
5. Please read in the section Troubleshooting our service address and phone number.
Macrovision
U.S. Patens Nos. 4,631,603; 4,577,216; 4,819,098; 4,907,093; 5,315,448 and 6,516,132
"This product incorporates copyright protection technology that is protected by U.S. patents
and other intellectual property rights. Use of this copyright protection technology must be
authorized by Macrovision, and is intended for home and other limited viewing uses only
unless otherwise authorized by Macrovision. Reverse engineering or disassembly is prohib-
ited."
Dolby
Manufactured under license from Dolby Laboratories. “Dolby” and the double-D symbol are
trademarks of Dolby Laboratories. Confidential Unpublished works. 1992-1997 Dolby
Laboratories, Inc. All rights reserved.
7

Recycling Information
Recycling of electronic devices
This product is designed and manufactured with high quality materials and
components which can be recycled and reused.
This symbol means that electrical and electronic equipment, at their end-of-
life, should be disposed of separately from your household waste.
Please, dispose of this equipment at your local community waste collection/
recycling centre. In the European Union there are separate collection systems
for used electrical and electronic product. Please, help us to conserve the
environment we live in!
English
Recycling of paper and carton
The material recycling symbol on the carton and user manual denotes that
they are recyclable. Dispose them not with the normal household waste.
Recycling of plastic parts
The material recycling symbol on the plastic parts denotes that they are
recyclable. Dispose them not with the normal household waste.
Green Dot
The “Grüne Punkt” denotes that the MAS Elektronik AG pays a duty to the
“Gesellschaft für Abfallvermeidung und Sekundärrohstoffgewinnung“.
8

Accessoires
When opening the package of this Portable-DVD player please make sure that the following
accessories are included:
• HSD 2220
• Remote Control
• Batteries for the Remote Control
• User Manual
• International Warranty Card
English
Notes:
• If any item should be damaged or missing, please contact your dealer without delay.
• Keep the packaging materials, you may need them to transport your player in the
future.
• Always transport or send the player in its original packing.
• Do not change or modify any components of the device or accessories.
Features
• MPEG-4 DVD Player
• USB connector on the front panel
• SCART with RGB video output
• YPbPr RCA video output
• CVBS Video RCA jack
• S-Video out
• Coaxial digital audio out
• Optical digital audio out
• Stereo RCA Audio output
Standard Setting
The default settings are:
Languages: Englisch
TV System: PAL
Video output: SCART RGB
Aspect Ratio: 4:3 PS
9
Quick Start Guide
1. Connect the power adapter (supplied with the player) to the side input and to a wall
outlet.
2. Press the POWER button (Please refer No. 7).
3. Press the OPEN/CLOSE button (Please refer No. 3).
4. Inserting a DVD disc (Please refer No. 1 - Disc Loader). Align the center of the DVD
disc with the center of the disc guide.
5. Then press the OPEN/CLOSE button again (Please refer No. 3).
6. In general, the DVD already inserted into the player will start reading automatically.
If not, press the PLAY button (Please refer No. 4).
7. When you want to stop, press the STOP button (Please refer No. 5).
8. If you want to playback content from USB flash storage, please put the USB flash
English
storage into the USB plug of teh DVD player. Press the USB button on the remote
control or on the device (No. 6) and choose “USB
” from the list and confirm by
pressing the ENTER button. The DVD player chenges into the USB mode.
9. To power off the unit, press the POWER button on the remote control. The device
goes into Stand.By mode.
10. To power off completly the device, please press the POWER button (Please refer
No. 7).
10
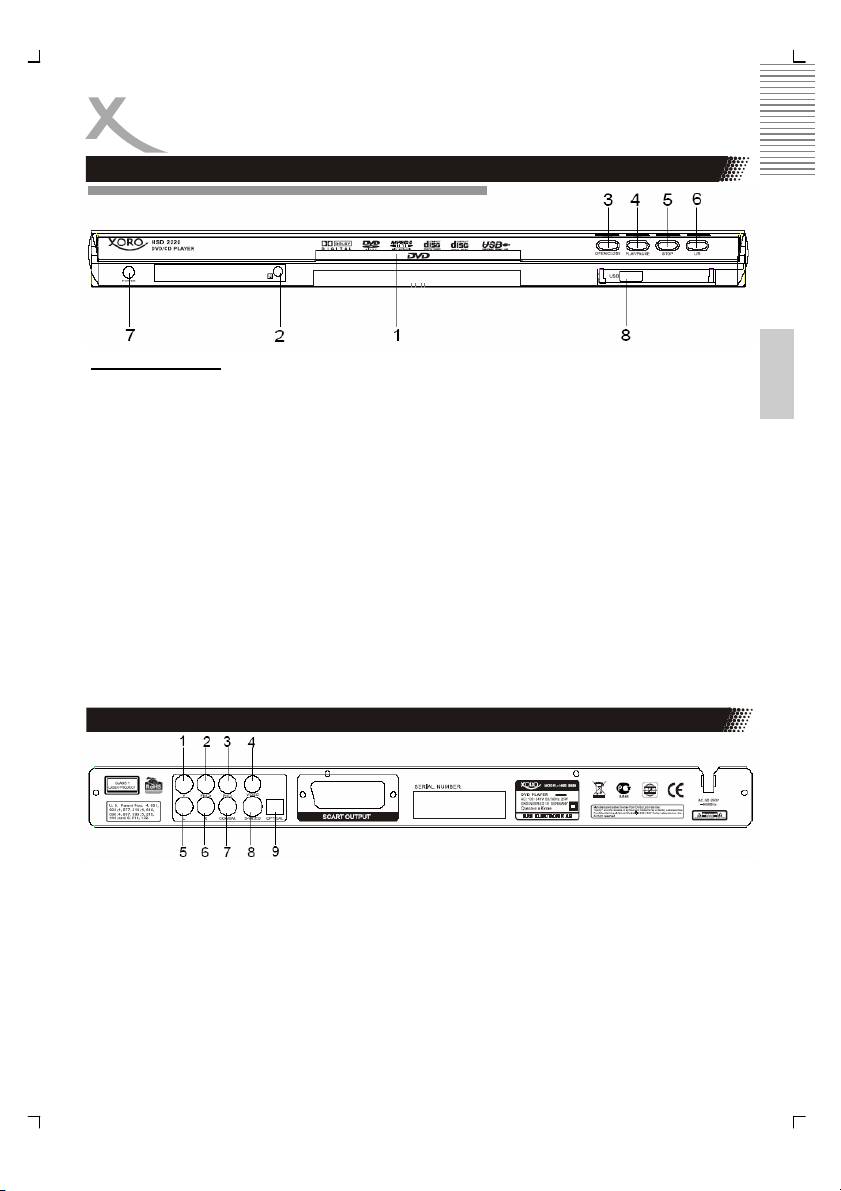
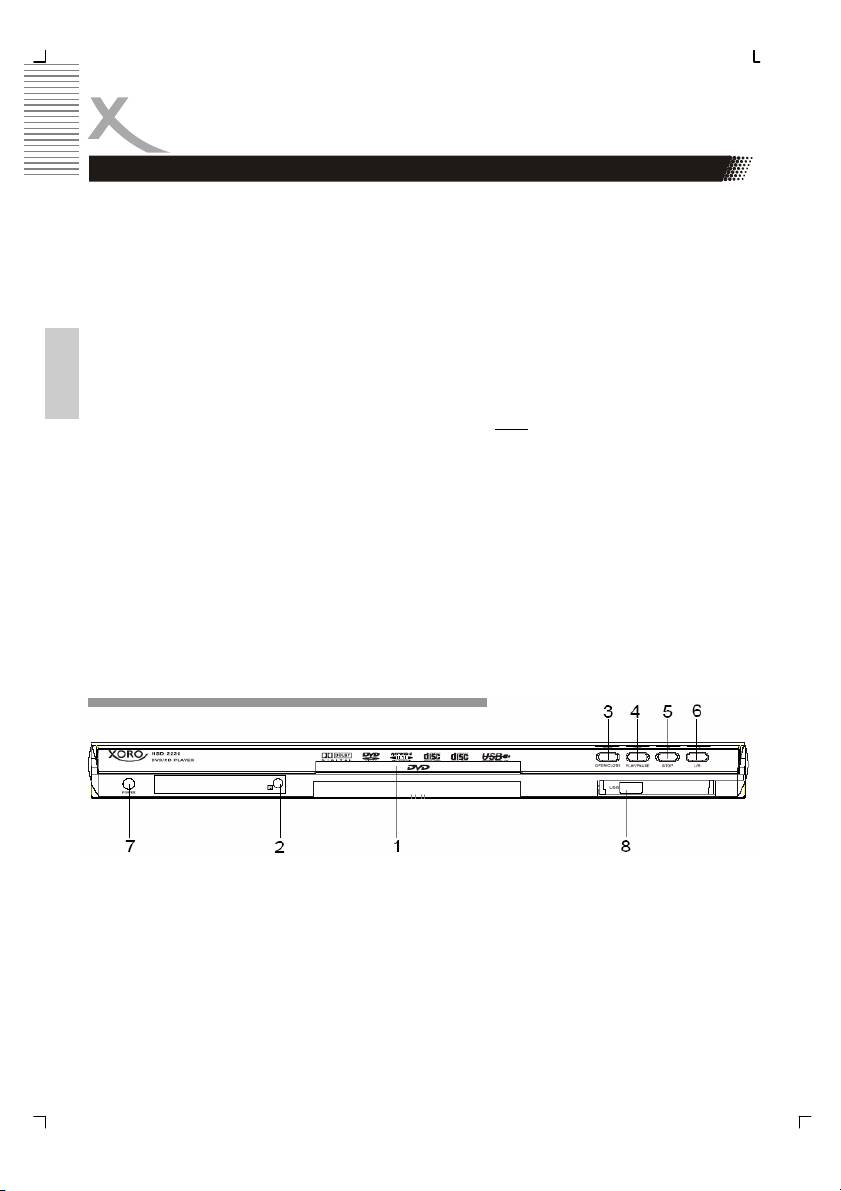
Control Elements
Front Panel
English
Control elements
1. DVD Loader
2. Infra-red sensor
3. OPEN / CLOSE button
4. PLAY / PAUSE button
5. STOP button
6. USB button
7. POWER button
8. USB connector
Notes:
• Before you plug the power cord into the AC outlet, please check to make sure that all
of the connections have been properly completed. Plug the power cord carefully into
the outlet.
• When the unit is initially powered, a brief surge of electricity may cause interference
with other electronic equipment on the same circuit. If this occur, connect the unit to
an outlet on different circuit.
• For playback contents from USB, please use only USB flash RAM storages.
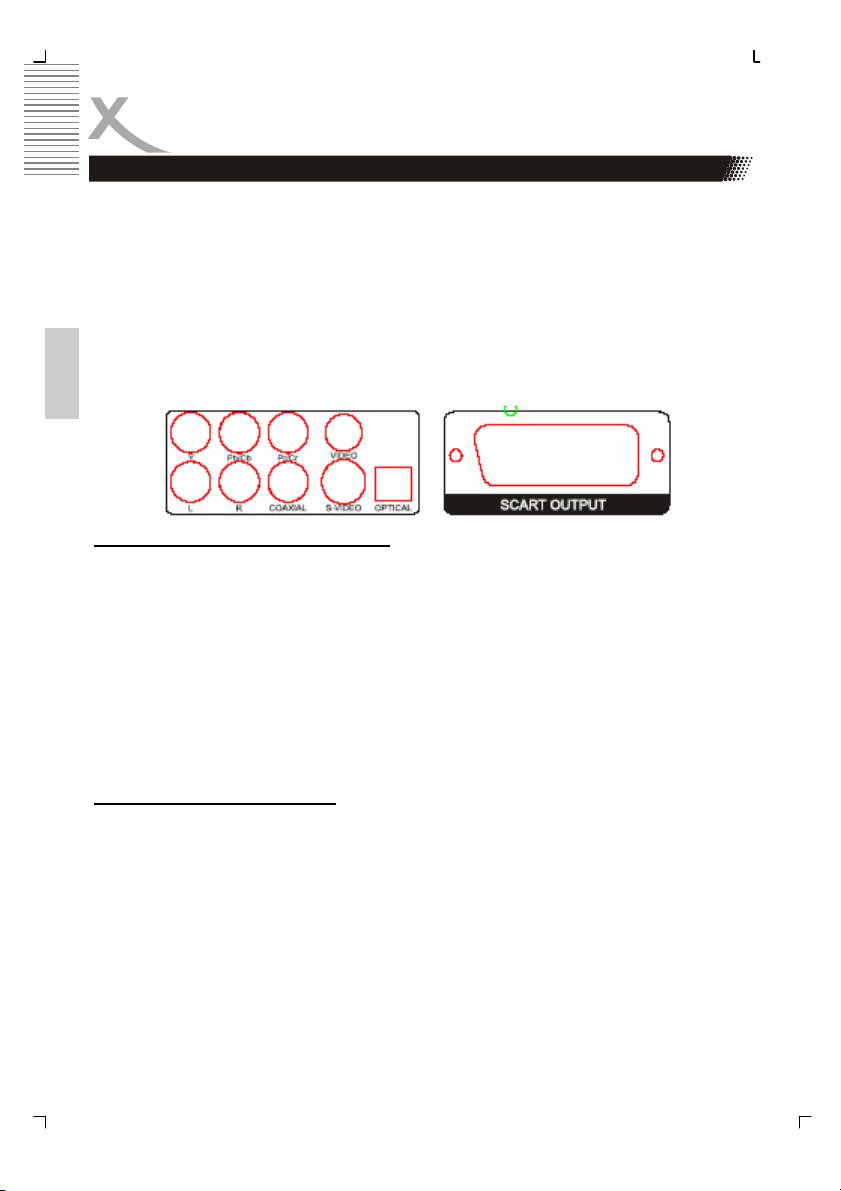
Rear Panel
1. Y components video output
2. Pb/Cb components video output
3. Pr/Cr components video output
4. CVBS video output
5. Left audio output (L)
6. Right audio output (R)
7. Coaxial digital audio output (electrical)
8. S-Video output
9. Optical digital audio output (SPDIF)
10. SCART connector
11
Connection
Video Output
The HSD 2220 provides different ways to output video and audio signals. Please refer the
below picture which shows the different Audio and Video outputs:
• CVBS
• S-Video
• SCART
• Component
• Stereo RCA
• Coaxial
• Optical
English
Connecting with a VIDEO (CVBS) cable
The video (CVBS) cable transmits the signals for brightness (Y-signal) and colour (C-signal)
in a combined way. You should only use this connection if no other connection type can be
used. Plug a cable into the VIDEO (CVBS) socket on the rear side of your DVD player. The
other side of the cable must be connected to the VIDEO input socket of the TV-set (usually
labeled “VIDEO IN” or “AV IN”. Please also refer to your TV set’s user manual). As VIDEO
(CVBS) does not transmit sound, you also must add an audio connection.
Insert one end of the supplied audio (Cinch [RCA]) cable into the white/red Cinch [RCA]
socket L/R AUDIO OUT at the back of the DVD player and the other end into the audio input
socket (usually white/red) on the TV set (usually labelled “AUDIO IN” or “AV IN”. Please also
refer to your TV set’s user manual)
Switch on the TV set and select the s-video input or the respective channel number. For
channel number and input selection please also refer to your TV operating instructions.
Connecting with a SCART cable
The SCART or Euro AV cable serves as the universal connector for picture, sound and con-
trol signals. Plug a cable into the SCART socket at the back of the DVD player and the
SCART IN socket on the rear side of the TV set. Please also refer to your TV set’s user
manual. Switch on the TV set and select the SCART input or the respective channel num-
ber. For channel number and input selection please also refer to your TV operating instruc-
tions.
Note:
The SCART interface of this DVD recorder is RGB enabled. In RGB mode, the picture qual-
ity is much better than in standard SCART mode. You can activate RGB mode on the video
settings page of your DVD recorder. You only can use this mode if it is supported by your TV
set. Otherwise, the use of RGB will result in wrong colour display. Please also refer to your
TV set’s user manual.
12

Connection
Video Output
Connecting with a S-Video cable
S-Video (S-VHS) cable transmits the signals for brightness (Y-signal) and colour (C-signal)
separately. This connection type offers a better picture quality as CVBS or SCART connec-
tion. Plug a cable into the s-video socket on the rear side of your DVD player. The other side
of the cable must be connected to the s-video input socket of the TV-set (usually labelled “S-
VIDEO IN” or “SVHS IN”. Please also refer to your TV set’s user manual). As s-video does
not transmit sound, you also must add an audio connection.
Insert one end of the supplied audio (Cinch [RCA]) cable into the white/red Cinch [RCA]
English
socket L/R AUDIO OUT at the back of the DVD player and the other end into the audio input
socket (usually white/red) on the TV set (usually labelled “AUDIO IN” or “AV IN”. Please also
refer to your TV set’s user manual). Switch on the TV set and select the s-video input or the
respective channel number. For channel number and input selection please also refer to
your TV operating instructions.
Connecting with a YUV (Y Pb Pr) cable
YUV (Y Pb Pr) is a transmission technology separating colour and brightness information in
the signal. Similar to RGB, the signals are transmitted on a 3 wire cinch [RCA] cable. This
way of transmission is also called “component”. This connection offers best picture quality
available with analogue signal transmission. Plug a cable into the Y Pb Pr socket on the rear
side of your DVD player. You can recognize the sockets by their colours red, green and blue
easily. The other side of the cable must be connected to the Y Pb Pr input socket of the TV-
set (usually labelled „Y Pb Pr“ or „HDTV IN“.
Please change the video output in the Setup settings to “YUV
”. In case, that your TV set
supports progressive Scan, you can choose by the settings “Scan Mode
” the option
“Progressive
”. Otherwise, you can change the setting during playback from “Interlaced” to
“Progressive
” by pressing the P-Scan button on the remote control.
As YUV does not transmit sound, you also must add an audio connection. Insert one end of
the supplied audio (Cinch [RCA]) cable into the white/red Cinch [RCA] socket L/R AUDIO
OUT at the back of the DVD player and the other end into the audio input socket (usually
white/red) on the TV set (usually labelled “AUDIO IN” or “AV IN”. Please also refer to your
TV set’s user manual). Switch on the TV set and select the YUV input or the respective
channel number. For channel number and input selection please also refer to your TV oper-
ating instructions.
Note:
Make sure you observe the colours of the three sockets when you establish the connection.
When the colours are connected in a wrong way, no picture or a picture with wrong colours
will be displayed.
13

Connection
Audio Output
Digital Output
This player contains a Dolby Digital or MPEG2 decoder. This enables the playback of DVD
recorded in Dolby Digital, MPEG1/2 audio or linear PCM without an external decoder sup-
ports. When the player is connected to an AV amplifier with 5.1 channel input connectors,
theatre quality audio could be enjoyed at your home at the time of playing disc recorded in
Dolby digital, MPEG1/2 audio or linear PCM.
The "S/PDIF" specifications allow several different types of cables and connectors which
must match the device being used. Key words for the electrical type are "coaxial" and "RCA
jack." The other type is called "optical" with the word "TOSLINK" often used.
1. Insert the audio plug into the orange socket on the rear side of the device (left from
English
the S-Video jack), marked with the label “COAXIAL”. Or, insert an optical cable on
the rear side of the DVD player into black quadrangular connector (right from the S-
Video jack), marked with the label “OPTICAL”.
2. Plug the Audio jack into the corresponding socket on your playback device or your
amplifier.
3. Choose on the amplifier the correspondent input (optical or coaxial).
Notes:
1. The cable is not part of the accessories.
2. Choose right audio setting for this player according to your audio system require-
ment after connection is made.
3. If the type of the speaker connected does not satisfy the channels recorded in a
MPEG-2 or Linear PCM disc, the disc will not be played in all channels but only in 2
channels (i.e. even if the front speakers and the centre speakers are connected, a
disc recorded in 5.1 channels will be played only in 2 channels.
When DVD discs recorded in DOLBY digital, MPEG audio or other formats are played, cor-
responding bit stream is output from the player COAXIAL digital audio output connector.
When the player is connected to an external decoder or a power amplifier, you can enjoy
theatre-quality at your home.
Caution for the coaxial digital audio output connector:
Do not connect an amplifier with a Coaxial digital input connector which does not contain the
Dolby digital or MPEG audio decoder otherwise it may be harmful to your ears and damage
your speakers.
Stereo Analogue Output
Insert one end of the audio (Cinch [RCA]) cable into the white/red Cinch [RCA] socket L/R
AUDIO OUT at the back of the DVD player and the other end into the audio input socket
(usually white/red) on the amplifier set (usually labelled “AUX IN” or “Stereo IN”. Please also
refer to your Amplifier user manual). Switch on the Amplifier and select the AUX or Stereo
input.
14
Remote Control
Insert batteries and Operation radius
• Opens the battery cover of the remote control.
• Insert the battery into the receptacle and insert the receptacle into the remote.
• Please uses only batteries of the type AAA/R03 (1.5 V)
• Please pay attention to the right polarity, which are given with the label + or –.
• Close the battery cover of the remote control.
• For the best results, aim the remote towards at the player, screwing window. Stay
English
within 5 metre and angles of 60 degrees or less.
• Under normal use the battery will last for one year.
• Remove battery during storage or when you are not using the DVD player for a long
time.
Notes:
1. Weak batteries can leak and several damage by the remote control.
2. Leaking out battery acid can damage your health.
3. Remove the battery from the battery compartment as soon as it is exhausted or if the
remote control is not going to be used for a longer period of time.
4. Wipe up leaked out battery acid with a cloth.
5. In case of skin contact immediately wash the affected area.
6. Seek medical advice if battery acid has been swallowed. In case of contact with your
eyes wash out the eyes and seek medical advice.
15
Remote Control
Buttons of the remote control:
1. POWER button
2. L / R button
3. Program button (PROG)
4. A—B Segment button (A-B)
L/R
5. REPEAT button
6. CLEAR button
7. MENU button
8. TITLE button
9. Navigation button UP
English
10. Navigation button LEFT
11. SETUP button
12. Fast backward button (<<)
13. Fast forward button (>>)
14. STEP button
15. ZOOM button
16. RETURN button
17. RESUME button
18. USB button
19. MUTE button
20. OPEN / CLOSE button
21. Numeric buttons
22. SUBTITLE button
23. AUDIO button
24. ANGLE button
25. Navigation button RIGHT
26. ENTR button
27. Navigation button DOWN
28. OSD button
29. SEARCH button
30. Previous button (|<<)
N/P
31. PLAY / PAUSE button (>||)
32. Next button (>>|)
33. Stop button
34. P-SCAN button
35. PBC button
36. N/P button
37. SLOW button
38. Decrease Volume (Volume-)
39. Increase Volume (Volume +)
16
