Dell Precision M20: Passwords
Passwords : Dell Precision M20

Back to Contents Page
Passwords
DellPrecision™MobileWorkstationM20User'sGuide
About Passwords
Using a Primary Password
Using an Administrator Password
Using a Hard Drive Password
Assigning an Asset Tag
Enabling Trusted Platform Module (TPM)
About Passwords
A primary password, an administrator password, and a hard drive password all prevent unauthorized access to your computer in different ways. The following
table identifies types and features of passwords available on your computer.
If you forget any of your passwords, contact your system administrator or contact Dell. For your protection, Dell technical support staff will ask you for proof of
your identity to ensure that only an authorized person can use the computer.
Using a Primary Password
The primary password allows you to protect the computer from unauthorized access.
After assigning a primary password, you must enter it each time you turn on your computer. The following message appears each time you turn on the
computer:
Please type in the primary or administrator password and press <Enter>.
To continue, enter your password (with no more than eight characters).
If you do not enter a password within 2 minutes, the computer returns to its previous operating state.
If you have assigned an administrator password, you can use it instead of the primary password. The computer does not specifically prompt you for the
administrator password.
Using an Administrator Password
The administrator password is designed to give system administrators or service technicians access to computers for repair or reconfiguration. The
administrators or technicians can assign identical administrator passwords to groups of computers, allowing you to assign the primary password.
When you set an administrator password, the Configure Setup option becomes available in system setup. The Configure Setup option allows you to restrict
NOTE: Passwords are disabled when you receive your computer.
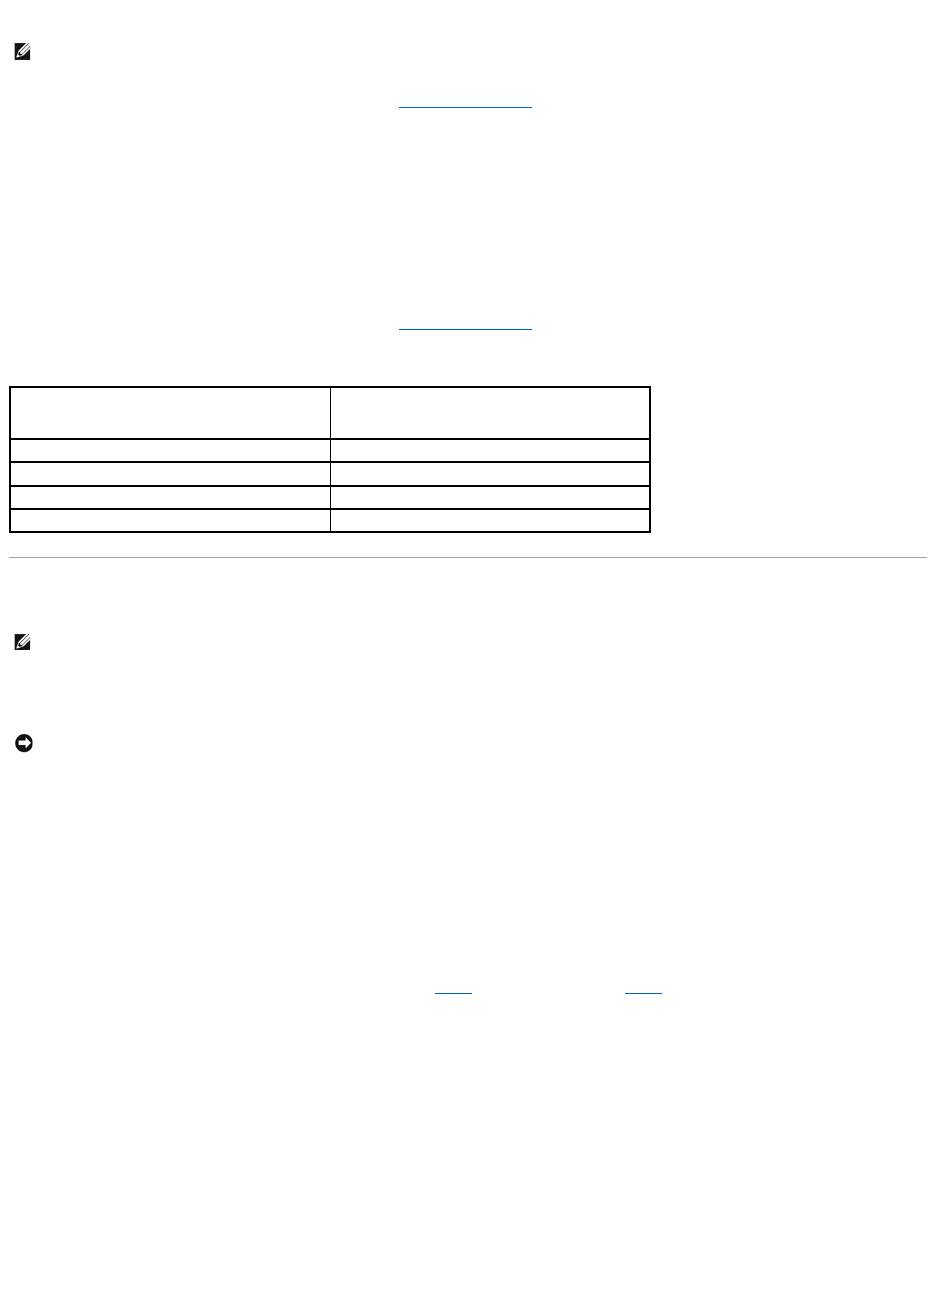
Type of Password
Features
Primary
l Protects the computer from unauthorized
access
Administrator
l Gives system administrators or service
technicians access to computers for repair or
reconfiguration
l Allows you to restrict access to system setup
in the same way a primary password restricts
access to the computer
l Can be used instead of the primary password
Hard drive
l Helps protect the data on your hard drive or
external hard drive (if one is being used) from
unauthorized access
NOTE: OnlyharddrivespurchasedfromDellforusewiththeDellPrecision™D-Family computers support hard drive passwords.
NOTICE: Passwords provide a high level of security for data in your computer or hard drive. However, they are not foolproof. If you require more
security, obtain and use additional forms of protection, such as smart cards, data encryption programs, or PC Cards with encryption features.
NOTICE: If you disable the administrator password, the primary password is also disabled.

access to system setup in the same way that a primary password restricts access to the computer.
The administrator password can be used instead of the primary password. Whenever you are prompted to enter the primary password, you can enter the
administrator password.
If you forget the primary password and do not have an administrator password assigned, or if you have both a primary and an administrator password
assigned but forget them both, contact your system administrator or contact Dell.
Using a Hard Drive Password
The hard drive password helps protect the data on your hard drive from unauthorized access. You can also assign a password for an external hard drive (if
one is being used) that can be the same as or different from the password for the primary hard drive.
After assigning a hard drive password, you must enter it each time you turn on the computer and each time you restore the computer to normal operation
from standby mode.
If the hard drive password is enabled, the following message appears each time you turn on the computer:
Please type in the hard-disk drive password and press <Enter>.
To continue, enter your password (with no more than eight characters). Press <Esc> to return the computer to its previous operating state.
If you do not enter a password within 2 minutes, the computer returns to its previous operating state.
If you enter the wrong password, the following message appears:
Invalid password
[Press Enter to retry]
If you do not enter the correct password in three attempts, the computer tries to start from another bootable device if the Boot First Device option in system
setup is set to allow start-up from another device. If the Boot First Device option is not set to allow the computer to start from another device, the computer
returns to the operating state it was in when you turned it on.
If the hard drive password, the external hard-drive password, and the primary password are the same, the computer prompts you only for the primary
password. If the hard drive password is different from the primary password, the computer prompts you for both. Two different passwords provide greater
security.
Assigning an Asset Tag
The Asset Tag utility allows you to enter an asset tag that you or your company assigns to the computer. After you enter an asset tag, the tag appears in the
system setup screens.
You can also use the Asset Tag utility to enter an owner tag that appears in the system log-on screen and with the primary password prompt.
Download the Dell Portables Asset Tag utility from the support.dell.com website to create bootable media (such as a bootable CD or floppy disk), and then
use the bootable media to assign an asset tag.
1. Save and close any open files and exit any open programs.
2. Ensure that you have a drive for the bootable media (such as a floppy drive or a CD drive).
3. Access the support.dell.com website. Download the Dell Portables Asset Tag utility for your system. Unzip the files and run the Asset Tag utility to
create the bootable media.
4. Boot the computer, using the bootable media:
a. Restart the computer.
b. Press<F12>immediatelyaftertheDELL™logoappears.
If the operating system logo appears, wait until you see the Microsoft®Windows®desktop, and then shut down the computer and try again.
c. Press the arrow keys to select the drive containing the bootable media and press <Enter>.
5. Type asset and a space followed by the new asset tag, and press <Enter>.
NOTICE: If you disable the administrator password, the primary password is also disabled.
NOTE: The administrator password provides access to the computer, but it does not provide access to the hard drive when a hard drive password is
assigned.
NOTE: The administrator password provides access to the computer, but it does not provide access to a hard drive that is protected by a hard drive
password.
NOTE: Some of these features may not be available for your computer or in certain countries.
NOTE: The Dell Portables Asset Tag utility may not be available as a download in certain countries.

For example, type the following command line and press <Enter>:
asset 1234$ABCD&
6. When the computer prompts you to verify the asset tag, type y.
The computer displays the new or modified asset tag and the Service Tag.
7. Restart your computer to exit the Asset Tag utility.
Viewing Existing Asset and Service Tags
1. Boot the computer using the bootable media you created in "Assigning an Asset Tag."
2. Type asset and press <Enter>.
Deleting an Asset Tag
1. Boot the computer using the bootable media you created in "Assigning an Asset Tag."
2. Type asset /d and press <Enter>.
3. When the computer prompts you to delete the asset tag, type y.
Assigning an Owner Tag
An owner tag can have up to 48 characters; any combination of letters, numbers, and spaces is valid.
1. Boot the computer using the bootable media you created in "Assigning an Asset Tag."
2. Type asset /o and a space followed by the new owner tag, and press <Enter>.
For example, type the following command line and press <Enter>:
asset /o ABC Company
3. When the computer prompts you to verify the owner tag, type y.
The computer displays the new owner tag.
NOTE: An asset tag can have up to 10 characters; any combination of characters excluding spaces is valid.
Deleting an Owner Tag
1. Boot the computer using the bootable media you created in "Assigning an Asset Tag."
2. Type asset /o /d and press <Enter>.
3. When the computer prompts you to delete the owner tag, type y.
Asset Tag Options
To use one of the asset tag options (see the following table):
1. Boot the computer using the bootable media you created in "Assigning an Asset Tag."
2. Type asset and a space followed by the option, and then press <Enter>.
Enabling Trusted Platform Module (TPM)
TPM is a hardware-based security feature that can be used to create and manage computer-generated encryption keys. When combined with security
software, TPM enhances existing network and computer security by enabling features such as file protection capabilities and protected e-mail. The TPM feature
isenabledthroughaTPMsystemsetupoption.
Enabling the TPM Feature
1. Turn on your computer.
2. Install the TPM Software.
The TPM software is factory-installed in the C:\Dell\TPM directory. It may also be downloaded from support.dell.com.
3. Run the setup.exe file. Follow the on-screen instructions to install the Broadcom Secure Foundation software.
If you are using TPM on your computer for the first time, proceed to step4, otherwise, continue with step5.
4. To enable the TPM software:
a. Restartthecomputerandpress<F2>duringthePowerOnSelfTesttoenterthesystemsetupprogram.
b. Open the Security menu in system setup.
c. Select the TPM Security menu option and press <Enter>.
d. Set the TPM security option to On.
e. Press <Esc> to exit the setup program.
f. If prompted, select Save/Exit.
5. Activate the TPM setup program:
a. Boot your computer to the Microsoft®Windows®operating system.
b. Click Start® Programs® Broadcom Security Platforms Tools. Then, click the icon for the Security Platform Initialization Wizard.
NOTE: For security, you cannot set, change, or delete the owner tag if the primary or administrator passwords are set.
Asset Tag Option
Description
/d
Deletes the asset tag
/o owner tag
Specifies a new owner tag
/o /d
Deletes the owner tag
/?
Displays the Asset Tag utility help screen
NOTE: The TPM feature supports encryption only if the operating system supports TPM. For more information, see the software documentation.
NOTICE: If you use TPM, you must follow the backup procedures in the documentation that came with the software to secure your TPM data and
encryption keys. In the event of these backups being incomplete, lost, or damaged, Dell will be unable to assist in the recovery of encrypted data.

c. Follow the on-screen instructions to activate the TPM setup program. You only need to activate the program once.
You will be prompted to reboot your computer once the process is complete.
6. Physically activate the TPM:
a. Restart the computer and press <F2> during the Power On Self Test to enter the system setup program.
b. Open the Security menu in system setup and select the TPM Activation menu option.
c. Set the TPM activation state to Activate.
d. Save the changes and restart your computer.
7. Initialize the TPM owner and user passwords:
a. Boot your computer to the Microsoft®Windows®operating system.
b. Click Start® Programs® Broadcom Security Platforms Tools. Then, click the icon for the Security Platform Initialization Wizard.
c. Follow the on-screen instructions for creating the TPM owner, user passwords, and credentials.
Back to Contents Page
Оглавление
- DellPrecision™MobileWorkstationM20User'sGuide
- About Your Computer
- Appendix
- Alert Standard Format (ASF)
- Using a Battery
- Using the Module Bay
- Using CDs, DVDs, and Other Multimedia
- Cleaning Your Computer
- Dell Diagnostics
- Using the Display
- Reinstalling Software
- Finding Information
- Getting Help
- Glossary
- Using the Keyboard and Touch Pad
- Passwords
- Using PC Cards
- Power Management
- Dell™QuickSetFeatures
- Adding and Replacing Parts
- Using the System Setup Program
- Using Smart Cards
- Solving Problems
- Specifications
- Travelling With Your Computer
- Connecting to a Wireless Local Area Network
- Using Microsoft®Windows®XP
